行指令 “Asynchron/Synchron” (异步/同步)
这些命令实现了后台焊接和修磨。
Asynchron (异步)

Synchron (同步)

SERVOZANGE (伺服钳):选择焊钳--在列表中只显示已激活选项 后台流程已激活 的焊钳。
Asynchron (异步):固定焊钳在铣削/焊接时可进行异步运动。
Synchron (同步):请等待,直到可能已启动的后台流程已结束,然后锁闭后台流程。然后,固定焊钳在铣削/焊接时不再可进行异步运动。
后台进程功能
固定焊钳进行电极头修磨的过程中,一般情况下机器人不能进行其他作业。(例如拾取一个新工件。)
这是因为机器人轴和附加轴(=焊钳)为同步运行。这意味着它们会执行同样的动作,同时开始同时结束。修磨过程中机器人轴在一般情况下虽然保持静止,但是仍属于总运动的一部分。
通过后台命令可以使固定焊钳进行异步运动。此时机器人轴可独立于焊钳进行另外的运动。不仅在修磨时可进行异步的焊钳运动,焊接时也同样可以。但这仅适用于无实际工件的测试焊接(例如在检查阻力时)。
后台进程
• 行指令 Asynchron (异步)开通所选后台进程,即允许执行进程。异步打开附加轴(= 焊钳)。
• 机器人控制系统设定显示它已经为后台焊接或修磨准备就绪的输出端。
• 机器人控制系统等待由 PLC 通过相关输入端选择后台过程。
• 机器人控制系统通过输出端应答成功的选择。
• 执行后台进程。
• 机器人控制系统向 PLC 报告可能出现的错误。
• 如果没有出现错误,则机器人控制系统报告成功地完成了后台进程。
• 机器人控制系统等待 PLC 的确认。
• 后台进程已完成。
• 用行指令 Synchron (同步)锁闭 (Disable) 后台进程。
同步打开附加轴(= 焊钳)。
VWKUKA程序事例:
PTP VB=100% VE=0% ACC=100% RobWzg=1 Base=0 SPSTrig=0[1/100s] P
SERVOZANGE 1 Synchron Bedingung=EIN 开启同步
PTP VB=100% VE=0% ACC=100% RobWzg=1 Base=0 SPSTrig=5[1/100s] P
TECH4 Prozessgeraet EZ/SP/KE/RZ Steuerung=Nr1 Zange=Nr1 in Wartungsstellung Techaufruf=EIN开始维修位置
SERVOZANGE 1 Messen= Geometrie Bedingung=E132开启维修位置测量
F277 = F78 + F79开启铣削
PTP VB=100% VE=0% ACC=100% RobWzg=1 Base=0 SPSTrig=0[1/100s] P
SERVOZANGE 1 Asynchron Bedingung=F277开始摆臂铣削
SPSMAKRO65 = F277开始摆臂铣削
PTP VB=100% VE=0% ACC=100% RobWzg=1 Base=0 SPSTrig=0[1/100s] P
用于控制电伺服焊枪 的IO通讯点:SGRW_BoolIOs[40]
SGRW_BoolIOs[1]={Index 0,IOType #Output,Index1 3510,Index2 0,VarName[] "SG_StartTipDress_BG"}
SGRW_BoolIOs[2]={Index 0,IOType #Output,Index1 3513,Index2 0,VarName[] "SG_StartInitNew_BG"}
SGRW_BoolIOs[3]={Index 0,IOType #Output,Index1 3514,Index2 0,VarName[] "SG_StartInitSame_BG"}
SGRW_BoolIOs[4]={Index 0,IOType #Output,Index1 3511,Index2 0,VarName[] "SG_StartWelding_BG"}
SGRW_BoolIOs[5]={Index 0,IOType #Output,Index1 3512,Index2 0,VarName[] "SG_SpsAknowledge_BG"}
SGRW_BoolIOs[6]={Index 0,IOType #Output,Index1 3507,Index2 0,VarName[] "SG_Active_BG"}
SGRW_BoolIOs[7]={Index 0,IOType #Output,Index1 3508,Index2 0,VarName[] "SG_Success_BG"}
SGRW_BoolIOs[8]={Index 0,IOType #Output,Index1 3509,Index2 0,VarName[] "SG_Error_BG"}
SGRW_BoolIOs[9]={Index 0,IOType #Output,Index1 3858,Index2 0,VarName[] "SGRW_GunSelect1_BG"}
SGRW_BoolIOs[10]={Index 0,IOType #Output,Index1 3890,Index2 0,VarName[] "SGRW_GunSelect2_BG"}
SGRW_BoolIOs[11]={Index 0,IOType #Output,Index1 3922,Index2 0,VarName[] "SGRW_GunSelect3_BG"}
SGRW_BoolIOs[12]={Index 0,IOType #Output,Index1 3410,Index2 0,VarName[] "SGRW_GunSelect4_BG"}
SGRW_BoolIOs[13]={Index 0,IOType #Output,Index1 3442,Index2 0,VarName[] "SGRW_GunSelect5_BG"}
SGRW_BoolIOs[14]={Index 0,IOType #Output,Index1 3474,Index2 0,VarName[] "SGRW_GunSelect6_BG"}
SGRW_BoolIOs[15]={Index 0,IOType #Output,Index1 3505,Index2 0,VarName[] "SG_WeldReady_BG"}
SGRW_BoolIOs[16]={Index 0,IOType #Output,Index1 3506,Index2 0,VarName[] "SG_TipDressReady_BG"}
SGRW_BoolIOs[17]={Index 0,IOType #Output,Index1 3871,Index2 0,VarName[] "SGVW_DressInPos_Schw1"}
SGRW_BoolIOs[18]={Index 0,IOType #Output,Index1 3903,Index2 0,VarName[] "SGVW_DressInPos_Schw2"}
SGRW_BoolIOs[19]={Index 0,IOType #Output,Index1 3935,Index2 0,VarName[] "SGVW_DressInPos_Schw3"}
SGRW_BoolIOs[20]={Index 0,IOType #Output,Index1 3423,Index2 0,VarName[] "SGVW_DressInPos_Schw4"}
SGRW_BoolIOs[21]={Index 0,IOType #Output,Index1 3455,Index2 0,VarName[] "SGVW_DressInPos_Schw5"}
SGRW_BoolIOs[22]={Index 0,IOType #Output,Index1 3487,Index2 0,VarName[] "SGVW_DressInPos_Schw6"}
SGRW_BoolIOs[23]={Index 0,IOType #Output,Index1 3864,Index2 0,VarName[] "SGVW_BGFlag_GunClosed1"}
SGRW_BoolIOs[24]={Index 0,IOType #Output,Index1 3896,Index2 0,VarName[] "SGVW_BGFlag_GunClosed2"}
SGRW_BoolIOs[25]={Index 0,IOType #Output,Index1 3928,Index2 0,VarName[] "SGVW_BGFlag_GunClosed3"}
SGRW_BoolIOs[26]={Index 0,IOType #Output,Index1 3416,Index2 0,VarName[] "SGVW_BGFlag_GunClosed4"}
SGRW_BoolIOs[27]={Index 0,IOType #Output,Index1 3448,Index2 0,VarName[] "SGVW_BGFlag_GunClosed5"}
SGRW_BoolIOs[28]={Index 0,IOType #Output,Index1 3480,Index2 0,VarName[] "SGVW_BGFlag_GunClosed6"}
SGRW_BoolIOs[29]={Index 0,IOType #Output,Index1 3862,Index2 0,VarName[] "SGVW_GunOpen1"}
SGRW_BoolIOs[30]={Index 0,IOType #Output,Index1 3894,Index2 0,VarName[] "SGVW_GunOpen2"}
SGRW_BoolIOs[31]={Index 0,IOType #Output,Index1 3926,Index2 0,VarName[] "SGVW_GunOpen3"}
SGRW_BoolIOs[32]={Index 0,IOType #Output,Index1 3414,Index2 0,VarName[] "SGVW_GunOpen4"}
SGRW_BoolIOs[33]={Index 0,IOType #Output,Index1 3446,Index2 0,VarName[] "SGVW_GunOpen5"}
SGRW_BoolIOs[34]={Index 0,IOType #Output,Index1 3478,Index2 0,VarName[] "SGVW_GunOpen6"}
SGRW_BoolIOs[35]={Index 0,IOType #Output,Index1 3872,Index2 0,VarName[] "SGVW_DressFin1"}
SGRW_BoolIOs[36]={Index 0,IOType #Output,Index1 3904,Index2 0,VarName[] "SGVW_DressFin2"}
SGRW_BoolIOs[37]={Index 0,IOType #Output,Index1 3936,Index2 0,VarName[] "SGVW_DressFin3"}
SGRW_BoolIOs[38]={Index 0,IOType #Output,Index1 3424,Index2 0,VarName[] "SGVW_DressFin4"}
SGRW_BoolIOs[39]={Index 0,IOType #Output,Index1 3456,Index2 0,VarName[] "SGVW_DressFin5"}
SGRW_BoolIOs[40]={Index 0,IOType #Output,Index1 3488,Index2 0,VarName[] "SGVW_DressFin6"}
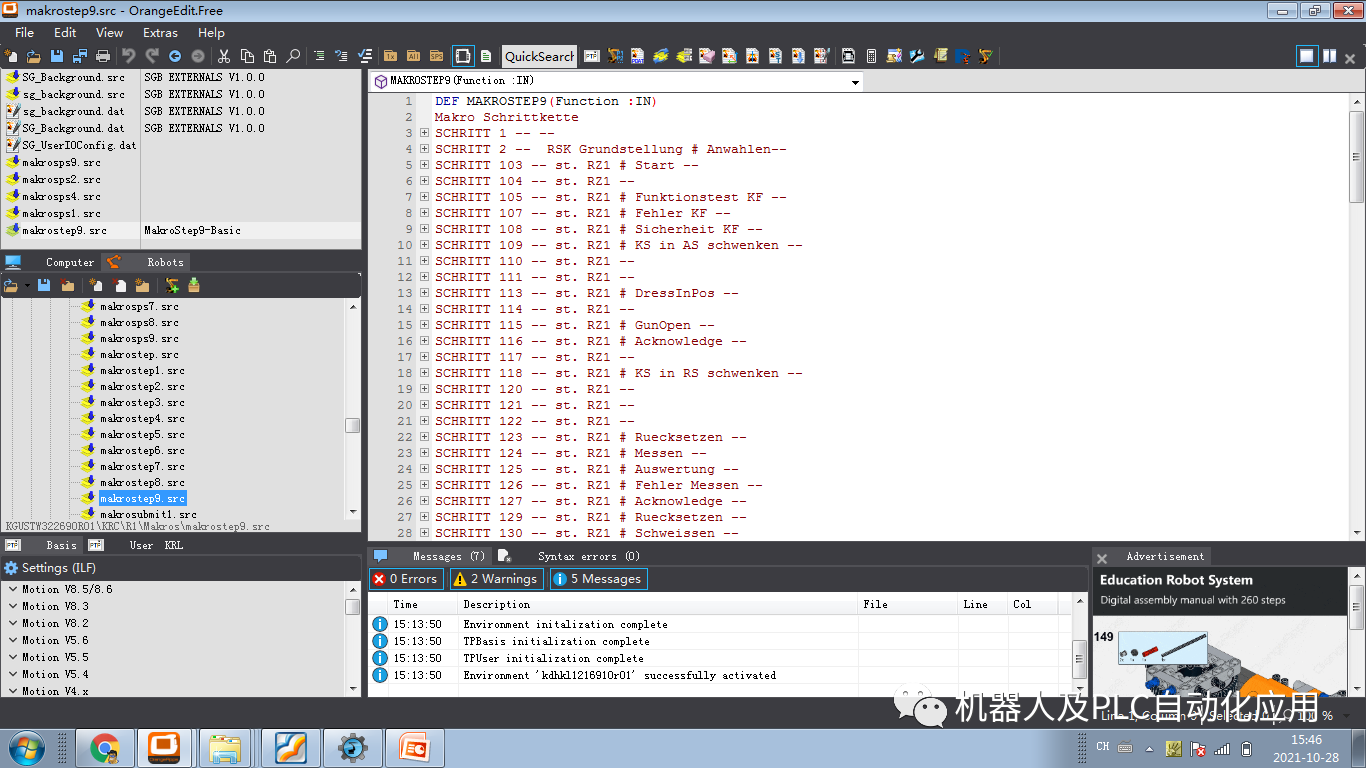
与makroSTEP9配合使用实现了固定电伺服的铣削过程.